Domesticate AWS nested stacks in Java: doing the chores Cloudformation doesn't do (w/ code samples)

Domesticate AWS nested stacks in Java: doing the chores Cloudformation doesn't do (w/ code samples)

In this article we’ll navigate through the creation of a Nested Stack in Cloudformation using the Java SDK. The child stack will be a lambda function, and the code will be uploaded with a zip archive.

What’s Cloudformation, and what’s a nested stack?

Cloudformation is the AWS offering of infrastructure as code. Instead of navigating the web UI adding and configuring resources, Cloudformation offers the capability of reading a user - supplied file (either JSON or YAML) containing the list of resources and their relationships and create them as the code states.
These resources must be grouped in Stacks, which is the parentmost object that Cloudformation can process.
Things get interesting when stacks reference other stacks, of course :-)

Read more
Please stop publishing AWS S3 buckets as static websites! Read here for a secure, fast, and free-ish approach [1st episode]

Please stop publishing AWS S3 buckets as static websites! Read here for a secure, fast, and free-ish approach [1st episode]

I promise this is not yet another tutorial on how to publish a static website using AWS S3, or at least not solely smashing the S3 content onto the web. I’d like to show you a GitHub project that uses Java to orchestrate Cloudformation when deploying the architecture of a static website.

The main purpose of this tool is going beyond the S3 out of the box website functionality, that is:

  • Make the S3 bucket private (so, secure)
  • Provide HTTPS certificates (secure, again)
  • Serve the content via cloudfront cache (so, fast)
  • Hide the complexities of working with Cloudformation

I’m in for fast and secure, but free…ish?

Not all the resources that need to be fired up for this architecture are within the AWS free tier, expecially the domain. Nevertheless, all the costs that I’ve seen after this website was published were only live costs. Let’s review them from the most to the least expensive:

  • The domain: 20€ / year if hosted on Route53 (as marcoaguzzi.it) but you can host it elsewere (on cloudns, and it’s free)
  • Route53 and Codepipeline: 1€ / month each. It’s one for the hosted zone and one for the pipeline. The pipeline comes with a good amount of free build / minutes
  • Secret manager: less than 0.5€ / month (there’s a grace period when started)
  • Cloudfront and S3: 0.01€ / month each

Of course these are starting costs, they can go a lot higher as the usage increase, but it should be a welcomed issue, I suppose

Hide the complexities of Cloudformation

Cloudformation migth be a burden to use, especially within the web UI. These are the main issue I addressed in the project:

  • Have a self - contained architecture
  • Be repeatable. Could it deploy the same architecture on another domain?
  • Ease the deploy process, especially when the domain is not hosted on Route53
  • The nested stacks are not automatically resolved by Cloudformation

The Java tool to the rescue

While experimenting with Java and Gradle, I wondered if I could use Java to mitigate the problems listed above by orchestrating the instructions that Cloudformation needs in order to deploy the website. This turned out as a Github project: https://github.com/maguzzi/s3_static_website_gradle. The Gradle build creates a distributable archive with all the needed jars.

Read more
Update Github token in Codepipeline with Cloudformation

Update Github token in Codepipeline with Cloudformation

The use case

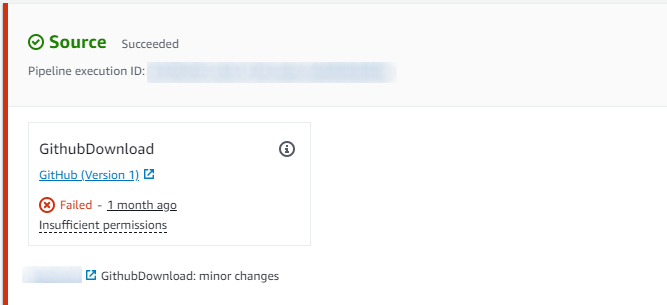
This post comes from the fact that the token used by Codepipeline to connect to Github to download the source code of the website has expired. Hence, the automation “push and update the website” is not working. Here’s the error:

Error in pipeline

Let’s view how the secret is stored into cloudformation, and how codepipeline can connect.

The secret stack

The cloudformation stack is quite easy. It does not have any hard dependency on other stacks, and it’s used both to download code for dev and prod website.

1
2
3
4
5
6
7
8
9
10
11
12
13
14
15
16
17
18
19
20
21
{
"AWSTemplateFormatVersion": "2010-09-09",
"Parameters": {
"GithubOAuthTokenParameter": {
"Description": "Github OAuth Token",
"NoEcho": "true",
"Type": "String"
}
},
"Resources": {
"GithubOAuthToken": {
"Properties": {
"Name": "GithubOAuthToken",
"SecretString": {
"Ref": "GithubOAuthTokenParameter"
}
},
"Type": "AWS::SecretsManager::Secret"
}
}
}

The next part of the post is dedicated on how to create and use this cloudformation template

Read more
A new AWS account: leave ROOT user and look out for expenses

A new AWS account: leave ROOT user and look out for expenses

Congrats! you’ve just opened a brand new AWS account. What now? Beside getting rid of the root account, the second most wise action to do before doing anything is setting some control for bills.
I’m writing this post because some months ago I incurred in a 20 - something dollar bill from AWS for one of the accounts I opened in order to do some exercises. The account hadn’t much going on, but I left a disconnected elastic IP on for about a week… thus the mishap.
So let’s see what I’d love to have done in that situation, of course along with the respective Cloudformation templates.

Activate cost explorer

While being with the root account, you might want to turn cost explorer on. You can do it from two places: in the main UI you should see a box with “Cost and usage”, and at its center a button stating “Turn on cost explorer”

Read more
Cloudformation templates for Cloudfront automatic cache invalidation using Lambda within CodePipeline

Cloudformation templates for Cloudfront automatic cache invalidation using Lambda within CodePipeline

In this post I’m going to show how I triggered an automatic cache invalidation for the Cloudfront distribution that is serving this website. As in the previous posts, all the resources will be provisioned via CloudFormation.
At the end of the post the CLI commands to create and / or update the resources will be shown.

The manual procedure

Once that the markdown file for a post is written and a local compilation / rendering has been made, the markdown source can be pushed on the git repo. That triggers the AWS Codepipeline that will download the source, render the markdown into html, and push the result to the S3 bucket served by Cloudfront.
Since Cloudfront is serving the S3 bucket, caching is in place. Newly pushed content won’t be visible until the cache expires, which is not feasible. So, after a successful compilation and pushing to S3, I manually get to Cloudfront distribution invalidations and fire a new invalidation. This way I’m sure that subsequent requests to the website will get the newly updated content.
In the images below the steps for manual invalidation are shown:

Go to CloudFront / Distributions, and search for “Invalidations” tab

Cloudfront invalidation manual step 1

Then selecting the last successful invalidation (shown below on the very left) and “copy to new” (upper right)

Cloudfront invalidation manual step 2

And then confirming the copy of the invalidation with the last path (the path /* is fine since AWS charges per invalidation, regardless of how much deep it is)

Cloudfront invalidation manual step 3

The invalidation takes a few minutes to be completed, and then the website is good to go. This is a mundane and forgetful-prone task, so I’m better automating it.

Automation setup

There is not an “invalidate cache” action that can be directly call from CodePipeline. A Lambda that actually creates the invalidation is needed and must be called as an action in the CodePipeline structure.
Let’s see in details the two resources:

Read more