An Oauth2 use case - Authenticating and posting articles with images via LinkedIn API (v. 202504)
In this article we will do a review of all the steps needed for authenticating on Linkedin via its API, which rely on Oauth2 protocol. After authentication, we’ll use the API to post content with images. We’ll assume that the reader already has an active account on LinkedIn.
We’ll go in details will all the requests and responses needed for succeeding, and in each step we’ll provide a sequence diagram to better follow the process.
We’ll also refer to the last version of the LinkedIn API, which is 2025-04.
The content will be as follow:
- Prerequisites before starting
- Oauth2 in Action
- Get the profile URN
- Finally posting content
We have a LinkedIn account, what else do we need?
Let’s do a summary here:
- a company page, needed for creating
- an app on LinkedIn
- Something capable to respond to a callback URL
A company page
In order to leverage Oauth2 protocol, a company page must be present on the profile we’ll use for posting the content.
Creating a page is quite simple, it’s free, and the mandatory information are really a few. I’ve created mine basically for technical purposes like the one of this post.
We can view the page at this link.
An app on LinkedIn developer
Once logged in onto our profile, go to developer.linkedin.com to create the app that will be between us and LinkedIn in order to grant permissions. Let’s review the app creation:
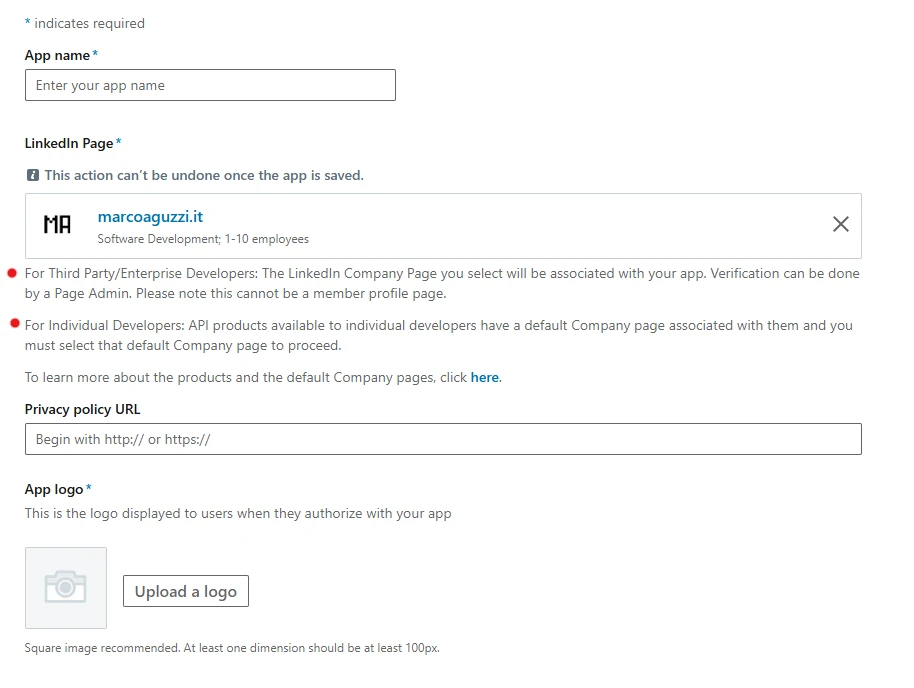
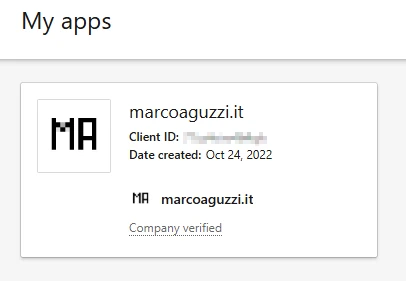
Other than the obvious name and logo (the privacy policy is not mandatory), the importand part is the company page linked to the app. We’ve put a red dot on the sentences that explain how developers, apps, and company page are regulated. Once created the app is listed like this:
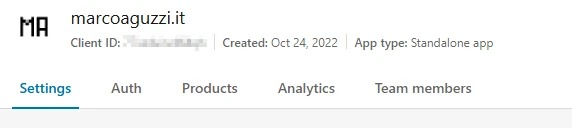
Configuring the app
Let’s review the app configuration for Oauth2. This is the header we’ll be presented after creating the app:
Settings
It just shows the main information entered upon creation. We can skip the screenshot this time
Auth
This is the one that matters. It contains 3 boxes, which are
Application credentials
It is dedicated to Client ID and Client Primary secret, which are used for the authentication calls. We could do a screenshot here, but it would be all greyed out 🙂
OAuth 2.0 settings
Big stuff here. Let’s show the screenshot:
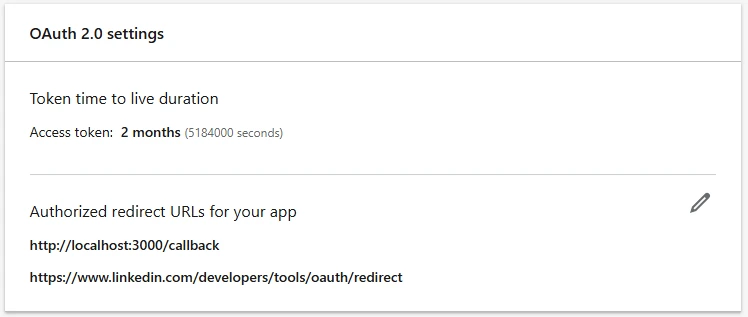
The box shows the time to live of the token (we’ll see how to have it in a minute), which is two months. Then it shows the address of the redirect urls that LinkedIn will use to send its code and state for the authentication process. Before seeing the details, let’s just say that:
- The localhost address is something that will live on our PC, valid for testing purposes, and LinkedIn is completely fine about that.
- The LinkedIn address has been automatically added by LinkedIn while using the procedure to manually create an authorization token via its web UI. Also this one is for testing purposes but it can come handy.
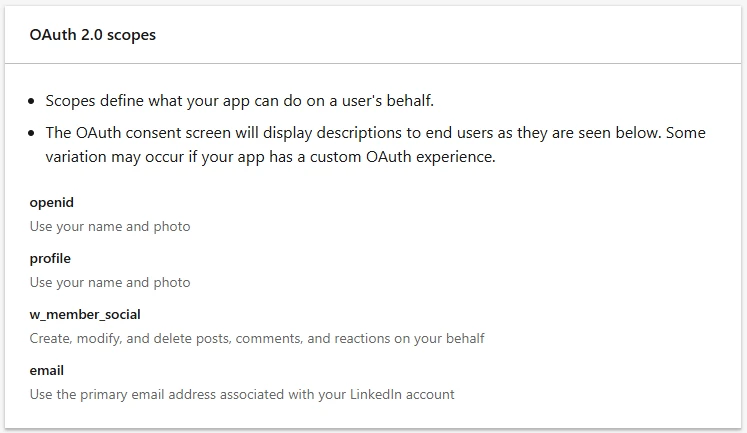
OAuth 2.0 scopes
Those are used used by LinkedIn to set boundaries for the actions. Some of them are required for posting, others for logging in. In the free tier, we can activate all the possible four options. The screenshot here will give explanation of all the cases:
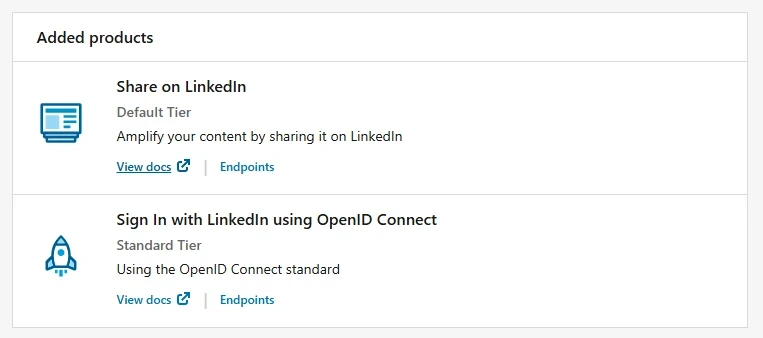
Products
The products define what the app will do with LinkedIn: and our app need will “Share on Linkedin” and “OpenID Connect”
(A server for the) redirect URL
As we’ve seen above, we’ve configured redirect urls in the app, so we’ll need something to listen to those url and respond.
For this test, I’ve scraped down some python code from AI that just gets the job done. The code is meant to run on localhost, so there’s no need to make it available through some cloud. I’m putting the code in this gist in order to have the full picture to look at instead of leaving only two or three lines in between the text of this article. The pros of having something written from scratch is the possibility to see the actual calls going back and forth from LinkedIn and the local PC.
How should I run the server?
I’ve downloaded Python 3.13 and IDLE, a minimal Python shell, to run the python file on my PC. The code of the server requires some library installation, which can be done via pip install
Now we should have everything set up and ready to see
Oauth2 in action
Let’s start with a sequence diagram like the one below and follow the numbered steps.
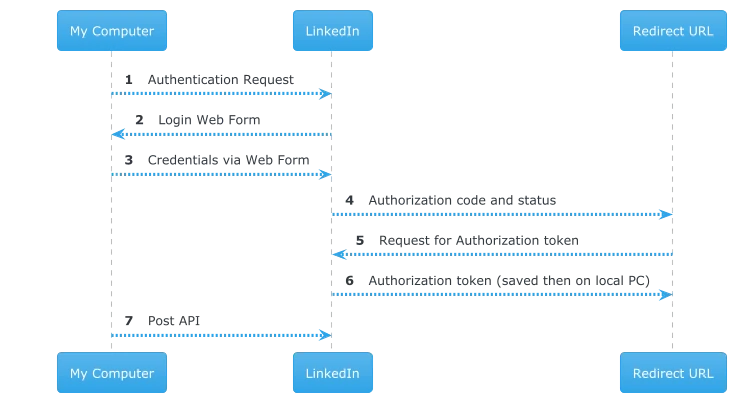
(1) Authentication request
From local PC, issue the request with the client id, the scope(s), and the callback url. We can find all this information in the app. Let’s list them one by one:
client_idis taken from the app configuration- the
redirect_uri(url encoded)http://localhost:3000/callbackmust match exactly one that’s registered in the app - the
stateis something that can range from a static string to whatever algorithm we like, and it can be used to counter CSRF attacks - the
scopeis the list of four ones we’ve seen above (w_member_social, profile, openid, email)
1 | curl --location 'https://www.linkedin.com/oauth/v2/authorization?response_type=code&client_id=<client_id>&redirect_uri=http%3A%2F%2Flocalhost%3A3000%2Fcallback&state=<state>&scope=w_member_social%2Cprofile%2Copenid%2Cemail' \ |
(2) HTML form
LinkedIn will respond with an HTML containing the form for entering our credentials. We can issue the GET request in the browser and the HTML form contained in the response will render automatically, as shown here below
(3) Submit the form
Now we can insert login and password and submit the authentication form
(4) Redirect URL in action
If the login gets through, LinkedIn will call the redirect URL specified in call (1) and, of course, registered in the app. It will receive the status and the authorization code. The code listening on the redirect URL is in charge of validating the status, and checking if the call Is legitimate. It’s up to us to implement this step fully or just have a pass through. Let’s view the request from LinkedIn from IDLE logs
1 | 127.0.0.1 - - [17/Apr/2025 22:19:12] "GET /callback?code=<unique_code_from_linkedin>&state=<arbitrary_state> HTTP/1.1" |
(5) Request for the authorization token.
Once the webhook has received the code from LinkedIn, it’s ready to issue the request for the authorization token with a post to the url
1 | curl --location 'https://www.linkedin.com/oauth/v2/accessToken' \ |
(6) Response with authorization token
If successful, this can be used for subsequent calls to actually get stuff done. This token has a validity of two months and once expired should be renewed by redoing this same procedure. LinkedIn always requires a “manual” login before calling the api, we can also check in enterprise integration tools where we’ll be asked to enter our credentials to renew the token
1 | { |
The answer contains: the access token, simply in the field access_token; the expiration time (60 days in seconds); the scopes we’ve entered before, the token type indicating that it will be used in header as Bearer <access_token>; a technical id. We’ll refer to the token from now on as <authorization_token>
(7) Calling post API
There are quite a few options for posting content on LinkedIn through API. The first choice is whether to use the person profile or the Company profile. We’ll explore the first option here.
Once the target has been chosen, there are three possibilities, each of them corresponding to the media option in the request
- Share a text only
- Share a text with (multi) image
- Share a text with link to an article
- Share a text with video
While text only and link cases resolve in a single call, for image (and media in general) things get quirkier. We’ll explore the image option. But, before being able to proceed, we’ll have to check for one last piece of information:
Who am I?
We need to know the URN of our profile in order to insert it in the subsequent calls. Once that this section is done, we’ll refer to it as <profile_urn>. Once given the authorization token, it’s a matter of a single call, ruled by the open_id scope, which had to be present in the oauth2 requests.
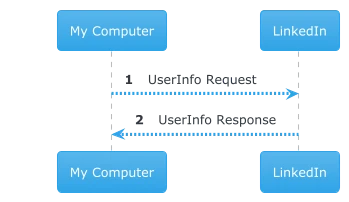
(1) userinfo request
1 | curl --location 'https://api.linkedin.com/v2/userinfo' \ |
(2) userinfo response
1 | { |
The information we want to parse from this json is the “sub” attribute of the body, that has be concatenated into its urn like urn:li:person:---. This will be the <profile_urn>
Posting with images
Please note If we search on the internet abost posting with LinkedIn api, a lot of content will refer to ugcPost API, which is deprecated, and json bodies and responses are more convoluted.
Refer to this page. At the time of writing, last version is April 2025
Let’s review a sequence diagram here:
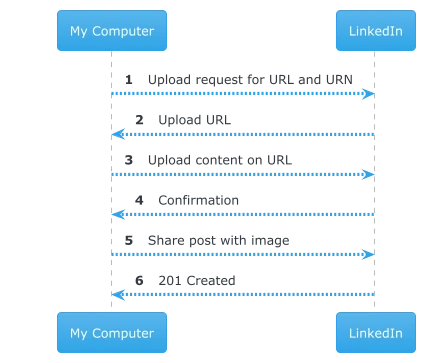
(1) Asking for the url to upload the image post
In this request we’re asking LinkedIn the address to use to upload our image and the URN that should be used when sharing the post at the end of the process
1 |
|
(2) The response with the upload url and the media urn:
1 | { |
The releavent information is contained in two fields. We’ve redacted to --- unique codes generated by LinkedIn.
The upload url is in response["value"]["uploadUrl"], that is
1 | https://www.linkedin.com/dms-uploads/sp/v2/---/uploaded-image/---/0?ca=vector_ads&cn=uploads&iri=B01-77&sync=0&v=beta&ut=--- |
and the asset urn is in response["value"]["image"] , that is urn:li:image:---. We’ll refer to this element as <media_urn> in subsequent API calls
(3) Upload the image
With this information we can issue the upload request with the actual image payload
1 |
|
(4) Upload image response
The response is just an acknowledge of the upload (201 created), we can just check for http errors
(5) Share the post
We’re finally ready to create the content, putting the authorization_token, profile_urn, and media_urn in the body of the posts API call
1 |
|
(6) 201 Created
Once the post is published, the image will be displayed below the text, while the link will appear in a box below the text. Bear in mind that any link present in the text of the share will be automatically shortened by LinkedIn and left in its original position.
Conclusions and next steps
The process involves a lot of interactions, and there could be a lot more to talk about. To keep things simple, having the authorization token generated by the web UI is an option. Also using Postman in order to avoid writing the code that issues the requests.
Next steps could be automatically write the link in the first comment of the post, in order not to have it shortened, and introducing some automation in the process.
Thanks for reading till here!
An Oauth2 use case - Authenticating and posting articles with images via LinkedIn API (v. 202504)
https://marcoaguzzi.it/2025/04/20/what-ive-got-on-linkedin-oauth2/


